
Algolia
If your custom storefront keeps its product catalogue in Algolia, this guide walks you through wiring that catalogue into Deducto. The result is a search integration: while you're authoring promotions inside the Deducto Dashboard, you can search and pick products, categories, brands, and so on directly from your Algolia indices instead of typing names or IDs by hand.
Where this fits in the bigger pictureDeducto doesn't read your Algolia indices when evaluating promotions at runtime – it evaluates against the cart data your storefront sends in each request. The search integration is purely a Dashboard-side convenience: it makes authoring promotion logic faster and less error-prone by giving you the same searcher experience you'd have shopping the site. It's entirely optional, but if your catalogue is large enough that typing IDs in by hand becomes unpleasant, it pays for itself quickly.
If you're not using Algolia and want the same convenience, the Typesense integration has identical capability.
There are four steps to set up an Algolia-backed project end-to-end. Steps 1 and 4 are Algolia-specific; steps 2 and 3 cover the project's attribute definitions and apply equally to any custom-storefront project (so if you've already set those up, you can skip ahead).
To begin, click the Edit icon next to your project in the project list and open the project configuration.
Step 1: Connect to your Algolia account
This step gives Deducto credentials to query your Algolia application from the Dashboard. It's read-only – Deducto only ever issues search requests.
- Navigate to the Integration tab in the project configuration.
- Select Algolia.
- Click Configure Connection Details.
- Enter your Algolia Application ID and a search-only API key.
- Click Save Connection Details.
Use a search-only API keyAlgolia admin keys can write to your indices and rotate keys themselves – Deducto never needs that. A search-only key limits the blast radius if the credential is ever compromised. You can mint one from the API Keys section of your Algolia dashboard.
Step 2: Define attributes
This step defines the custom attributes your project will use in promotion logic (for example: Brand, Material). These are independent of Algolia – they're the canonical attribute definitions for your project. See Attributes for the full conceptual treatment.
- Navigate to the Attributes tab in the project configuration.
- For each attribute you want to use:
- Click Add Attribute for a single-value attribute, or Add Array Attribute if the attribute will hold a list of values.
- Provide a label – this is what you'll see when referencing the attribute in promotion conditions.
- Choose the attribute type (String, Number, Boolean, etc.).
- Tick compulsory if every cart item must carry the attribute for promotion eligibility.
Repeat for each custom product attribute and cart attribute the project needs.
Step 3: Map attributes to incoming request fields
Defining an attribute names it in the Dashboard; mapping it tells Deducto which field in your storefront's request carries the attribute's value. The two can have different names – for example, your Algolia field might be brandName while you'd rather see Brand in the Dashboard.
- Navigate to the Mappings tab in the project configuration.
- For each product attribute and cart attribute, enter the Field Name the storefront will send. The expected data type is shown by the icon next to the field; array attributes have a distinctive marker.
After steps 1–3, the project is functionally complete – you can author promotions, the storefront can call the API, and Deducto will evaluate everything correctly. Step 4 adds Dashboard-side polish.
Step 4: Configure search indices
This is the step where setting up the Algolia integration really earns its keep. You're describing each index you want available inside the Entity Searcher – the in-Dashboard search UI that appears whenever a promotion condition needs to reference specific products, brands, categories, etc.
Have your Algolia dashboard open in another tab; you'll need to copy index names and field names across.
Navigate to the Search tab in the project configuration (this tab is only visible once you've selected Algolia or Typesense in step 1). Click Add Search Index for each index you want to register.
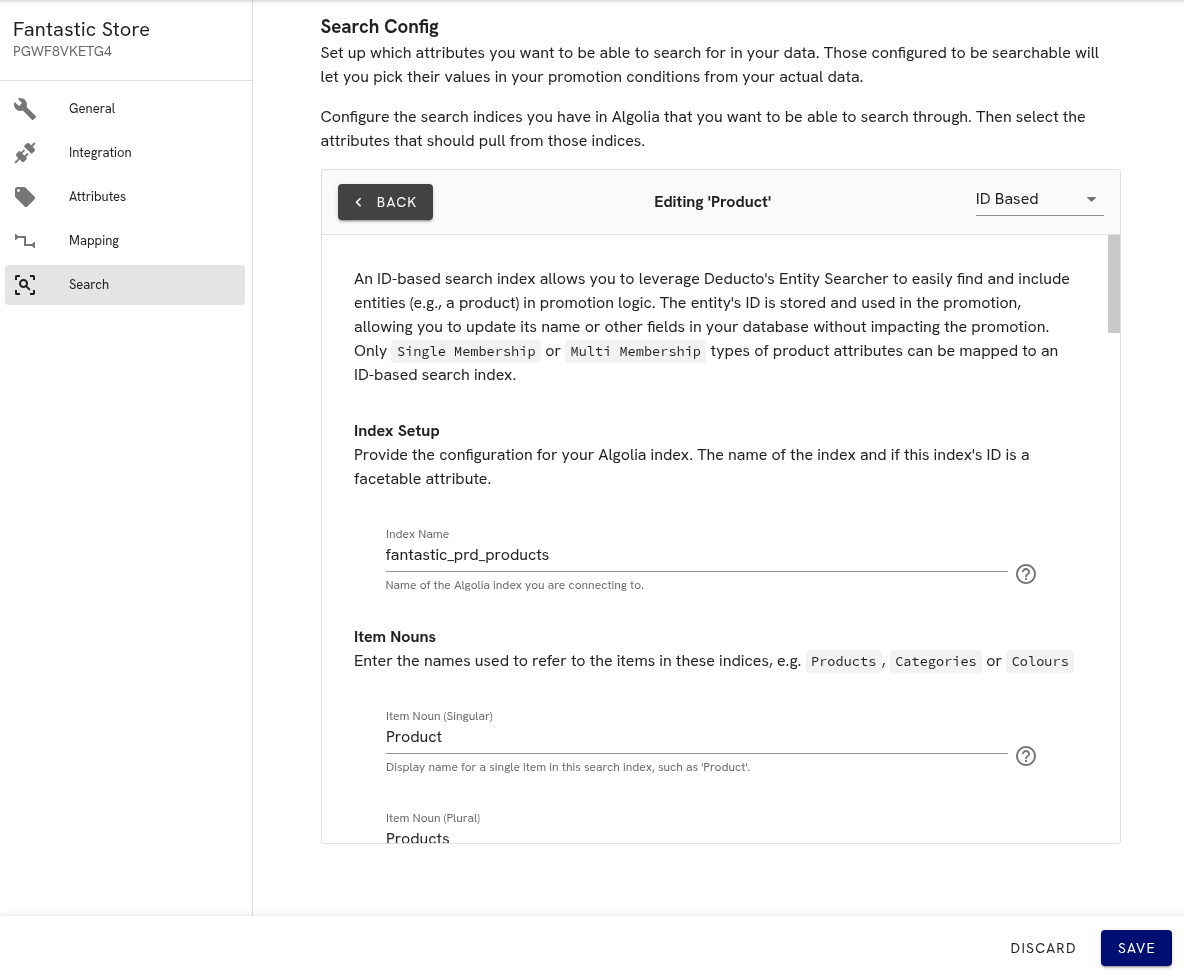
Search tab showing the top of an ID-based Algolia index configuration
For each index, you'll pick between two flavours:
ID-based vs value-based: when to use which
- ID-based index – the searcher stores the record ID in the promotion (e.g. Algolia's
objectID). Use this when the underlying entity is stable but renameable: products, categories with their own records, brands stored as separate records. Renaming "Nike" to "Nike Inc." in your record won't break the promotion because the promotion is bound to the ID, not the display string. Only Single Membership and Multi Membership attribute types can be linked to an ID-based index. - Value-based index – the searcher stores the facet value itself in the promotion (e.g. the literal string
"Nike"). Use this when the attribute lives only as a facet value, not as a separate record – sizes, colours, simple category names. If you later rename the facet value, any promotions referencing it have to be updated. Only Exact String and Wildcard String attribute types can be linked to a value-based index.
Rule of thumb: if there's a dedicated Algolia index for the entity (a products index, a categories index, a brands index), prefer ID-based. If the values live only as facet values on a parent index, value-based is the right choice.
Configuring an ID-based index
- Click Add Search Index and choose ID Based from the dropdown.
- Index Setup – enter the Algolia index name (e.g.
products). - Item Nouns – set the singular and plural labels (e.g. "Product", "Products"). These appear throughout the Dashboard when referring to records from this index.
- Index Attributes & Sorting – set the required base attributes:
- ID Attribute – the Algolia attribute holding the unique identifier (usually
objectID). This is the value stored in promotion logic. - Name Attribute – the human-readable title attribute. This is what the Dashboard displays in the searcher and condition editor.
- URL Path Attribute (optional) – the storefront path for the record. When provided alongside the project's Frontend Base URL, the searcher renders selected records as clickable links to the live store page.
- ID Attribute – the Algolia attribute holding the unique identifier (usually
- Index Attributes – click Add Attribute for any additional columns to surface in the searcher:
- Display Label – the column header in the searcher.
- Attribute – the Algolia field name.
- Refinement – tick to expose the attribute as a filter (requires the field to be facetable in Algolia).
- Hidden in Results – on refinement attributes, hide the column but keep the filter.
- Sort Indices – if your Algolia index has replicas for sorting, register them here. Each needs the full replica name (e.g.
products_price_asc) and a friendly label ("Price: low to high"). - Advanced Config (optional) – tune
Results Per Page, or apply a permanentFiltersclause to exclude records (e.g.discontinued:falseto hide retired products from the searcher). - Click Back in the top left.
- Locate the index you just created and tick the custom attribute(s) that should be backed by it.
Configuring a value-based index
- Click Add Search Index and choose Value Based from the dropdown.
- Enter the Algolia index that contains the facetable attribute.
- Set the singular and plural item nouns (e.g. "Size", "Sizes" for a sizes facet).
- Under Base Attributes > Target Attribute, enter the Algolia attribute name holding your facet values. These values are what gets stored in promotion logic.
- Advanced Config (optional) – same as for ID-based:
Results Per PageandFilters. - Click Back.
- Locate the index and tick the custom attribute(s) that should be backed by it.
Example: Categories
A concrete scenario makes the ID-vs-value choice clearer. Suppose your product index has a categories attribute on each product:
- If
categoriesholds category names (["Mens", "Outerwear"]) – set up a value-based index pointing at the product index'scategoriesfacet. Promotions reference the literal name strings. - If
categoriesholds category IDs (["cat_123", "cat_456"]) and you have a separatecategoriesindex keyed by those IDs – set up an ID-based index against thecategoriesindex. Promotions reference the IDs; renaming a category in your CMS doesn't break the promotion.
Either setup is then linked to a Categories custom array product attribute as the final action in step 4.
Updated about 2 months ago