
Creating a Project
This guide will help you create a new Deducto project.
To begin using Deducto, you'll need to create your first project. A project is where you'll manage promotions for your storefront - whether that's an online shop, mobile app, or any other sales channel. Each project has its own settings and promotions that you can customise to match your business needs.
This guide walks through each step of the wizard, from initial setup to connecting your storefront. Most fields can be edited later from project settings, so you can come back and adjust as you go – the main exception is the integration choice in step 2, which is more involved to change once the project is live.
Accessing the project creation wizard
If you've just completed the account setup process, you'll see a button to start a new project. Click it to go directly to the project creation wizard.
If you're already up and running and want to create another project (or if you had a look around after account setup) you can navigate to the Projects tab in the main sidebar under the Account section, and click "Create Project". This will also take you to the project creation wizard.
The project creation wizard will guide you through the following steps:
- General Information
- Integration
- Custom Attributes
- Attribute Mapping
- Search Configuration
- Review
1. General information
Basics
There are 3 fields to fill out in this section:
-
Name
The display name for this project, shown throughout the Deducto Dashboard. -
Description
An optional note to help you identify this project. Visible only inside the Dashboard. -
Frontend Base URL
This is the URL of your storefront that the Deducto Dashboard will use to link to product or category pages on your ecommerce store. If your projects and collections are under a common base path, make sure to include it. We recommend using thehttps://protocol to ensure links are always secure.
Locale settings
Your locale settings control which currencies you operate with, as well as your timezones and shipping methods.
- Default Currencies
The default currencies you set here will be used as the initial set when creating new promotions. While individual promotions can support different currencies, this list serves as the default template. For each supported currency, you can specify separate thresholds and monetary amounts, and the promotion logic will automatically use the relevant values based on the customer's cart currency.
NoteThis setting is only for currencies you accept as payment. If you have customers in or ship to other countries but still charge in a single currency, you only need to add that one currency.
-
Default Timezone
Promotions can be scheduled with automatic activation and deactivation times by setting start and end dates. The timezone used for these schedules is controlled by this default timezone setting.For businesses operating in a single timezone, we recommend setting this to your primary timezone - this way you won't need to modify it for each new promotion. If you operate across multiple timezones, choose the one where you'll run most promotions to streamline management.
While this default timezone is used when creating new promotions, each promotion can use a different timezone for scheduling. This flexibility makes it easy to create promotions targeted at specific regions.
You'll always have the option to override the default timezone when creating or editing individual promotions.
WarningThe timezone setting for a promotion only affects when the promotion starts and ends - it does not restrict which customers can use the promotion based on their location. This setting exists to make it easier to schedule promotions for specific regions or time periods (like local holidays or seasonal sales). To limit promotions to specific geographic areas, you should instead use custom attributes to identify and filter carts based on their location.
- Shipping Methods
Specify the shipping methods available in your store, such as Standard or Express delivery. When creating promotions later, you'll be able to choose which of these methods should receive shipping discounts.
Each shipping method needs two pieces of information:
-
A code - This is the identifier that your storefront uses and will be matched when verifying promotions. The correct code value depends on which service you're integrating with. Note that due to platform limitations, not all integrations support shipping discounts. Refer to the specific integration guides for more details.
-
A label - This is the human-readable name that appears in the Deducto Dashboard when setting up promotions. For consistency, we recommend using the same names that you use elsewhere in your systems.
Dynamic Shipping MethodsIf your store uses dynamically generated shipping methods that cannot be categorised into fixed classes, that's okay. You can still create promotions that apply discounts to all shipping methods generically – you just won't be able to write promotions that target a specific named method (for example, "free Express delivery only") without first defining that method here.
Advanced options (optional)
After setting up your locale settings, you have the option to configure advanced settings for your project.
These additional configuration options provide more granular control over your project's behaviour. Most projects can rely on the default values, which are designed to work well for common use cases. We recommend only adjusting these settings if you have specific requirements and fully understand how the changes will affect your project. Don't worry if you're unsure - you can always modify these settings later through the project settings page.
You'll find controls for various limits related to shipping methods, coupon codes, and cart items that act as safety boundaries. When a cart exceeds any of these limits, Deducto will not evaluate promotions for that cart. For more details about promotion evaluation and what happens when evaluation is skipped, see our Understanding the Promotion Evaluation Process guide.
The specific limits you can configure are:
-
Cart Item Limit
This setting controls the maximum number of distinct line-items that can be present in a cart. Once this limit is exceeded, no promotions will be evaluated for that cart.Consider increasing this limit only if your business regularly handles carts containing many different items.
NoteThis limit counts unique line items rather than total item quantities. For example, a cart with 5 units of the same product counts as 1 line item.
-
Coupon Limit
This setting determines how many coupon codes can be applied to a single cart. To prevent potential discount abuse, we suggest using a conservative value for this limit. -
Shipping Method Limit
This setting defines the maximum number of shipping methods that can be evaluated for a given cart.Deducto can handle dynamic shipping methods - those not explicitly defined in your project configuration. This flexibility accommodates stores whose carriers or shipping providers frequently update their available options. As long as a single cart doesn't exceed this limit Deducto will evaluate all shipping methods. However, to maintain optimal performance and response times, we recommend keeping the number of evaluated methods within reasonable limits.
TipIf you have set up a custom storefront integration and have more shipping methods than the default limit, we recommend only including the most relevant shipping methods in your API requests to Deducto initially. Only increase this limit if you must provide a large number of shipping method options for every cart every time.
2. Integration
In this step you tell Deducto how your project connects to your store's product data and (for fully integrated platforms) how promotions are applied on the storefront. See our Integrations Overview for the broader picture of how Deducto works with different storefronts.
NoteShopify projects are created via the Deducto Shopify App inside Shopify Admin. If you arrived at this wizard via that flow, the integration is already set to Shopify and locked here. See our Shopify Integration guide for the embedded-app onboarding flow.
For all other projects, the wizard offers three options:
- Custom / Generic
The default and most flexible option. Pick this if you run your own stack or use a platform Deducto does not yet offer a direct integration for. You handle the storefront-side API integration yourself. See our Custom Storefront Integration guide.
- Algolia
Pick this if your product data is searchable in Algolia. Deducto connects to your indexes so you can search products, categories, brands, and other attributes directly inside the Deducto Dashboard while authoring promotions. Selecting Algolia here covers the search/data side only – you still handle the storefront-side API integration yourself. See our Algolia Integration guide.
- Typesense
Pick this if your product data is in Typesense. Same shape as the Algolia option, just with a different search provider. You still handle the storefront-side API integration separately. See our Typesense Integration guide.
WooCommerce support is coming soon and is not currently a wizard option.
3. Custom attributes
In this section, you have the option to configure custom attributes that describe your products and cart data. Custom attributes are configurable data points that you can set up to match your specific needs. You can choose any name or type for them, with support for a wide range of types that enable specific checks in your promotion logic. Once set up, these attributes can then be used to build promotion logic.
NoteDeducto organises attributes into three categories:
- Core Attributes - Built-in attributes that come with every Deducto project
- Default Integration Attributes - Pre-configured attributes based on your chosen integration
- Custom Attributes - Additional attributes that you can define to match your specific needs
The first two categories are automatically set up by Deducto and your integration, while custom attributes give you the flexibility to define and configure your own data structures.
For more details on how attributes work in Deducto, see our Attributes concept guide.
Depending on your selected integration, custom attributes can pull data from different sources in your system. You'll need to specify what the attributes are and how they link to your storefront's data – see your integration's guide via the Integrations Overview for detailed setup instructions.
For example, a clothing store might define product attributes like Brand, Material, Category, and IsLimitedEdition, and cart attributes like LoyaltyTier or IsFirstTimeCustomer. These can then be referenced when building promotions – for instance, "20% off all Acme-brand items" or "free shipping for LoyaltyTier Gold customers".
To add a custom attribute:
- Select the "Product Attributes" or "Cart Attributes" tab depending on what the attribute describes. Attributes that vary per product should go under product attributes; attributes that describe the cart or the customer as a whole should go under cart attributes.
- Click either the "Add Attribute" button or the "Add Array Attribute" button. If the attribute is a list of items (e.g., the tags of a product), choose to add an array attribute. Otherwise, add a regular attribute.
- Enter details for the attribute:
- Name - This will be what you see when you select the attribute as part of a promotion logic so it's best to make it easy to pick out and understand what it represents at a glance.
- Type - Select the appropriate type for the attribute from the dropdown list. The type determines what kind of data the attribute will store and what operations you can perform on it in promotion logic. Some of the types include:
- Boolean - For true/false values
- Integer - For numeric values like quantities
- Money - For monetary values
- Exact String - For text values like product names or descriptions
- Membership - This is a special type used in conjunction with Algolia or Typesense integration. See our Algolia Integration or Typesense Integration guides for more details. Note that array attributes only support certain types - if you don't see the type you need in the dropdown, verify that it's compatible with array attributes.
- Compulsory - If the attribute should always be present when sending API requests containing cart data to Deducto and it being missing means something is wrong, then you can mark the attribute as compulsory. If some products or the cart may not have this attribute then keep this as non-compulsory. We recommend creating your promotion logic in such a way that empty attributes are handled appropriately where possible.
- Repeat the above steps for any other attributes you want to add. Once you have added them all, you can move on.
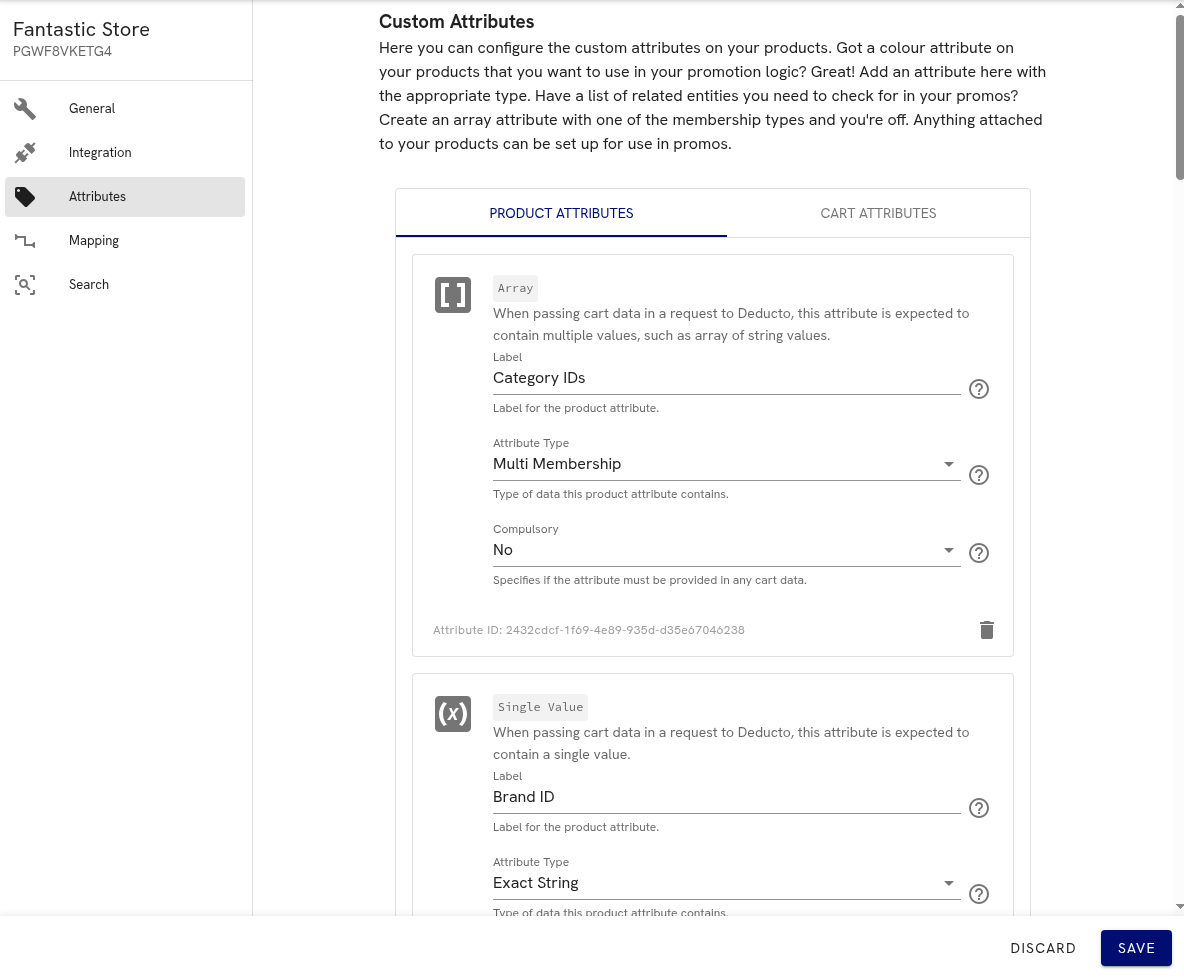
Custom Attributes step showing product and cart attribute tabs, attribute types, and compulsory settings
Attributes are a fundamental part of what makes Deducto so versatile and powerful. Since each integration platform handles attributes differently, we recommend consulting your specific integration guide via the Integrations Overview to understand the best practices and implementation details for your use case. Our Attributes concept guide also has more information if you'd like to learn more about them.
4. Attribute mapping
Now that you've configured your desired attributes for promotion logic, the next step is attribute mapping. This process tells Deducto where to find the corresponding data in your API requests by mapping each attribute to specific field names in your product or cart data.
Carrying through the clothing-store example from the previous section: if you created a Brand custom product attribute but your storefront's product data exposes that value under a field called product_brand, you would enter product_brand in the mapping field for Brand in this section. Repeat the same exercise for each attribute you defined.
The field name is whatever label your store or integration uses internally for that piece of data. If you're not sure what to enter, check with the developer responsible for building the storefront integration — they will know what field names appear in your product data.
If you are handling the integration yourself, the field name is the key used in the attributes object of each cart item when sending data to Deducto. For example, if your payload looks like this:
{
  "productData": {
    "productId": "abc-123",
    "name": "Slim Fit Jeans",
    "originalPrice": "89.99",
    "attributes": {
      "product_brand": "Acme",
      "product_category": "bottoms"
    }
  },
  "qty": 1
}
Then the mapping field for your Brand attribute should be product_brand, and for Category it should be product_category.
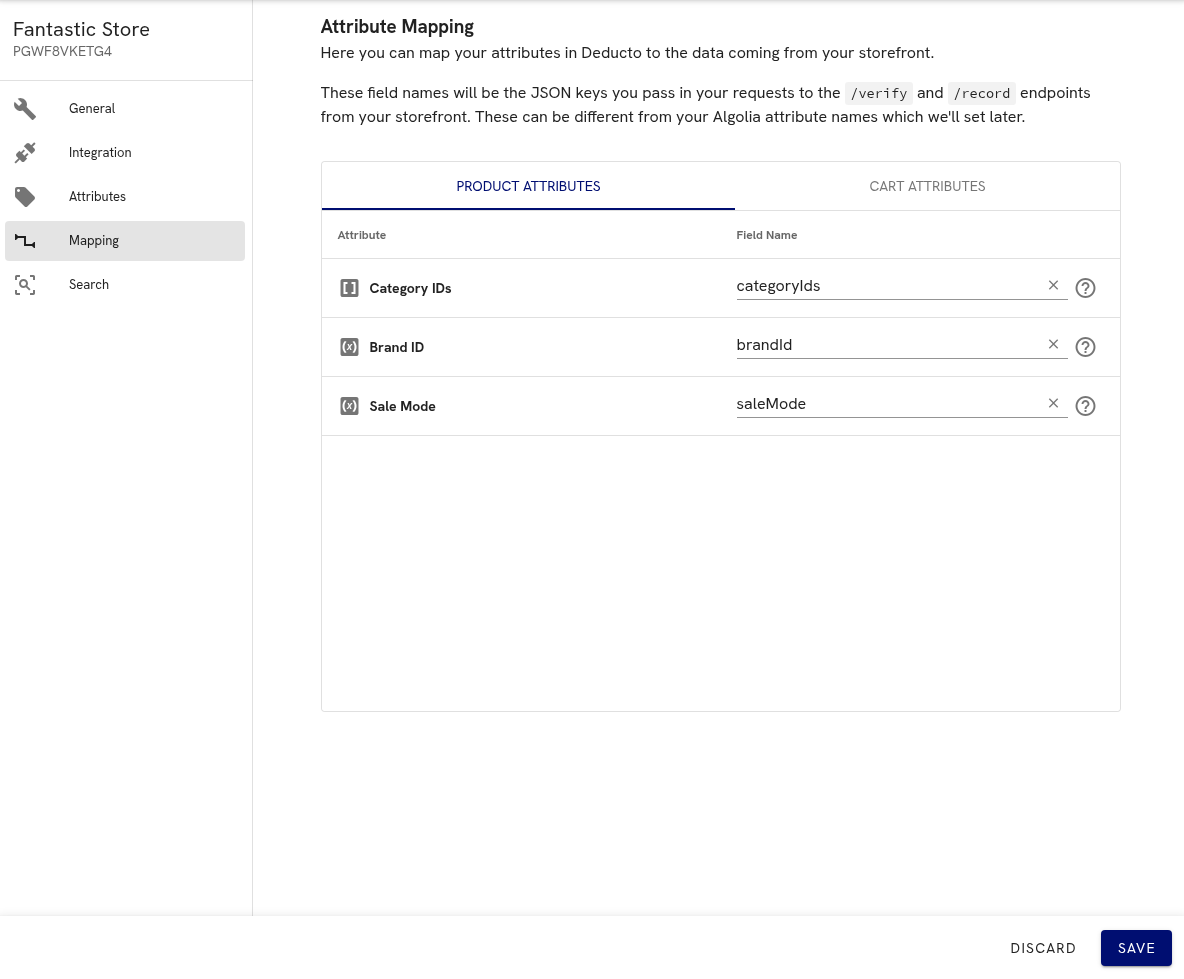
Attribute Mapping step showing how Deducto attributes are linked to incoming product and cart field names
The exact field names and how to locate them will vary based on your chosen integration type. For example, when making use of Shopify metafield capabilities, there are specific steps to follow when mapping these attributes – see Using Shopify metafields as custom product attributes in the Shopify integration guide.
In this section you will also see an "Advanced Mode" toggle. This allows you to enter the field names manually for the core attributes and default integration attributes Deducto makes use of by default. This is useful if you have a custom storefront integration and want to use specific field names in the product or cart data.
5. Search configuration
The last major section of the wizard lets you configure search for your Deducto project. This is a convenience feature that lets you search through your store's data directly inside the Deducto Dashboard when authoring promotions, so you don't have to copy product IDs or category names by hand.
The search functionality is supported for all integration types, but the setup process differs slightly for each. Full integrations like Shopify use the product data from the platform directly, which offers less customisation but is easier to set up (WooCommerce support is coming soon). Search integrations with Algolia or Typesense require more setup on your part to connect your Deducto project with your search provider. See the Integrations Overview, Algolia Integration, or Typesense Integration for more details.
Should you configure search now or later?
Configure search now if:
- you have a large catalogue and expect to author promotions by selecting products or categories rather than typing IDs
- you have an Algolia or Typesense instance already set up and credentials handy
- you want to target promotions at named brands, categories, or tags from the start
Skip and come back later if:
- you don't have your search-provider credentials yet
- your catalogue is small enough that entering product IDs by hand isn't a burden
- you're still evaluating Deducto and want to get to your first promotion quickly
You can revisit this configuration at any time from project settings. To skip for now, click the "Onto Review" button at the bottom of the page.
6. Review
The final step shows a summary of everything you've set up so far. Have a look through it, and click the edit button on any section if you want to revise something before saving – you can also navigate between sections using the steps at the top of the screen.
Most fields can be changed later from project settings, so don't worry about getting every detail perfect right now. The main exception is the integration provider you chose in step 2, which is more involved to switch once the project is live. When you're happy, click Save to create the project.
That's it – you're ready to start creating promotions.
Updated about 2 months ago