
Creating a Promotion
This guide walks through the steps to create a promotion, covering general settings, promotion behaviour configuration, trigger conditions, and discount actions.
Getting started
- Navigate to your desired project in the Deducto Dashboard
- Go to the Promotions list page
- Click the "New" button
- Select one of the three promotion types
Here you are presented with three promotion types. They determine how promotions will be applied to items in the cart:
-
Item Group: Applies to a group of products in a customer's cart, which may or may not be the entire contents. Use this when you want to target specific items or groups of items.
-
Whole Cart: Applies to the entire cart, treating all items as a single unit. This is useful for promotions like "10% off your entire purchase."
-
Whole Cart (Final): A specialised variant of Whole Cart with two key differences:
- Always processed last, regardless of any earlier promotion's
After Processingaction (includingStoporExclusive) - Does not reduce the cart subtotal that other promotions calculate against – use it for effects that sit outside subtotal-based discount logic, like shipping discounts and adding promotional gift items. This makes it ideal for "free shipping over $X" or "free gift with purchase" promotions that should run on top of whatever other discounts apply.
- Always processed last, regardless of any earlier promotion's
General information
After selecting a promotion type, you'll land on the General Information tab. This is where you set the promotion's identity, control when it runs, and decide how it interacts with other promotions.
Identity
- Name – A clear, descriptive label for the promotion. This is shown to the customer at checkout, so write it the way you want shoppers to read it.
- Description – Internal-only notes about what this promotion does. Used inside the Deducto Dashboard to help you distinguish promotions; not shown to customers.
- Supported Currencies – Which currencies this promotion is eligible to apply in.
- Timezone – The timezone used to interpret the schedule's start and end dates.
Activation and schedule
- Status – The master switch for the promotion.
Enabledmeans the promotion is included in evaluations subject to its schedule. A promotion with a future start date should still be set toEnabled; the schedule constrains when an enabled promotion actually applies.Disabledmeans the promotion is never evaluated, regardless of its schedule.
- Schedule
- Start Date – When the promotion begins applying. Leave empty if you want it to apply immediately upon being enabled.
- End Date – When the promotion automatically stops. Leave empty for an indefinite promotion.
Behaviour with other promotions
- Priority – A number that controls this promotion's position in the processing order. Higher numbers mean higher priority. For the full picture of how priority interacts with other settings during evaluation, see Understanding the Promotion Evaluation Process.
After ProcessingAction – What happens after this promotion has been evaluated:Continue– Processing moves on to the next promotion in order.Stop– No further non-Final promotions are processed once this promotion applies.Whole Cart (Final)promotions still run, since they always run last.Exclusive– Exclusive promotions are evaluated before non-exclusive ones. As soon as one exclusive promotion applies, no further non-Final promotions are considered.
- Lock Affected Items – Whether items that received this promotion's discount can also receive others.
Yes– Affected items are locked out of subsequent promotions.No– Items can receive discounts from other promotions as well.
Usage limits
- Max Use Count Per Coupon – Maximum total uses across all customers. Leave blank for unlimited. Useful for capped offers like the first 100 orders.
- Max Use Per Email Address Count – Maximum uses per customer (by email). Leave blank for unlimited. Helps prevent abuse on per-customer offers.
Coupons
The Coupons tab controls whether customers need a code to trigger the promotion and manages the pool of valid codes.
Requiring a coupon
- Coupon Required – when enabled, the promotion only applies if the customer supplies a valid coupon code at checkout. Leave disabled for promotions that should apply automatically (for example, a site-wide seasonal sale).
Coupon codes
When coupon required is enabled, you can supply codes in two ways:
- Single code – one shared code all customers use (for example,
SUMMER25). Simple to communicate, but gives you no visibility into which customer used it. - Coupon pool – a batch of unique, single-use codes. Use this when you need to track individual redemptions, prevent sharing, or run personalised campaigns.
You can add codes manually, generate them in bulk, or import a CSV. Once the promotion is saved, codes can be managed from the Coupons tab on the promotion's detail page.
Usage limits and coupons
The Max Use Count Per Coupon and Max Use Per Email Address Count fields in the General Information tab both interact with coupons:
- Max Use Count Per Coupon caps total redemptions across all customers for a given code.
- Max Use Per Email Address Count caps how many times one customer (by email) can use the promotion regardless of how many codes they try.
For single-code promotions, Max Use Count Per Coupon effectively caps the total number of uses of the promotion.
Trigger conditions
Trigger conditions are the gate that decides whether a promotion is eligible to apply to a given cart. Think of them as the if clauses of your promotion: only carts that satisfy these conditions can earn the discount.
If you leave the Trigger Conditions tab empty, the promotion is always eligible (subject to other constraints like coupons, schedule, and usage limits).
Building a condition
Each condition has three parts:
- a cart attribute to evaluate (for example
Original Subtotal,Item Count, or any custom cart attribute you defined in your project) - a comparison operator (
is equal to,is greater than,contains, etc. – operators offered depend on the attribute's type) - a value to compare against
You then combine conditions with a Match Type at the top of the builder:
all– every condition must be true (logical AND)any– at least one condition must be true (logical OR)
Each Match Type also has a negated variant for "none of these" / "not all of these" logic.
Grouping conditions for more complex logic
Two buttons let you grow the rule:
- Add Condition – adds a sibling condition under the current group's Match Type.
- Add Condition Group – adds a nested group with its own Match Type, so you can mix AND and OR.
For example, to express "subtotal over $200 AND (channel is "wholesale" OR cart has 5 or more items)", you'd set the outer group to all, add the subtotal condition, then add a nested group with Match Type any for the two customer/item conditions.
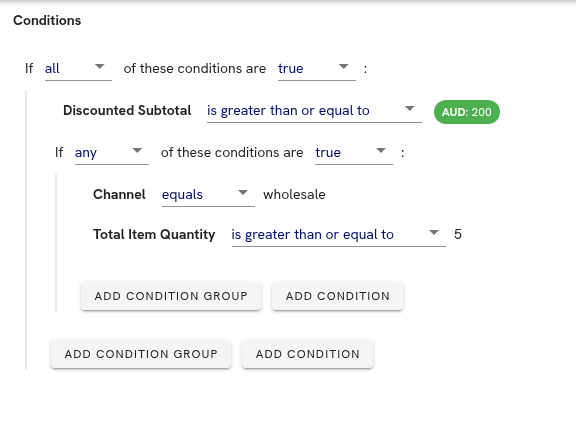
Trigger Conditions builder with an outer all group and a nested any group
Common examples
- Cart subtotal is greater than $100
- Cart contains at least 3 items
- Custom cart attribute
LoyaltyTierequalsGold - Custom product attribute
BrandcontainsAcme(for at least one item in the cart)
TipKeep trigger conditions focused on eligibility, not on which items receive the discount. Item selection happens in Item Groups (for Item Group promotions) or in the Promotion Action settings (for Whole Cart promotions, using the Exclusion Conditions).
Item groups
Item Groups define which items in the cart the promotion acts on. They're only used by Item Group promotion types – Whole Cart and Whole Cart (Final) skip this tab entirely.
A single promotion can define one or more item groups. Each item group describes a set of matching items, how many of them are needed to form a "batch" the promotion can discount, and (optionally) which item groups are required to coexist for the promotion to apply.
Defining an item group
For each group you create, you set:
- Name – a descriptive label that helps you identify the group when configuring the promotion's action later.
- Quantity – how many matching items make up one batch. If the cart has more matching items than the quantity, they automatically form additional batches. For example, with quantity
2, four matching items form two batches. - Conditions – product-level filters that decide which items belong in the group (for example,
Brand equals AcmeorCategory contains Shoes). Conditions work like Trigger Conditions but evaluate against individual products rather than the cart as a whole.
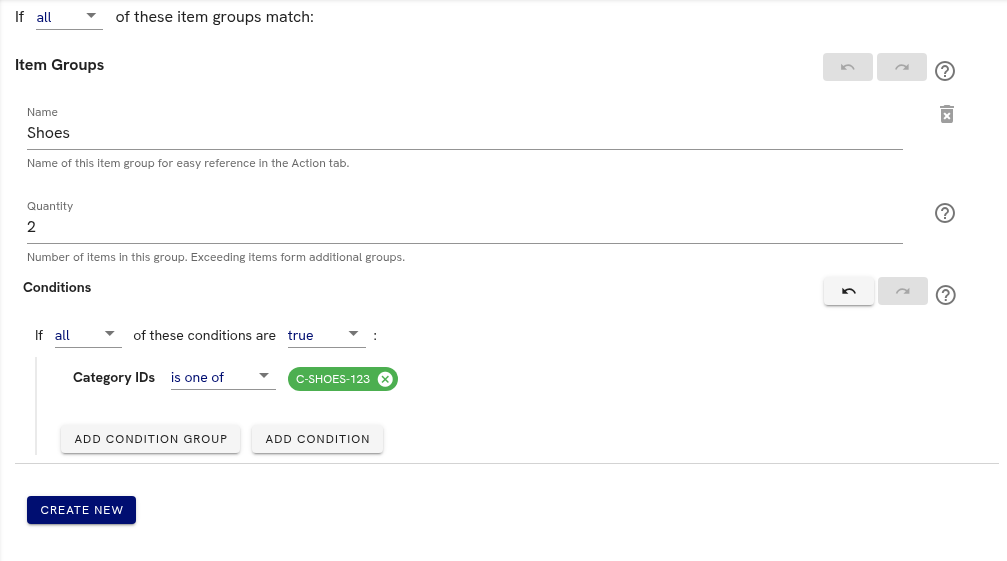
Example item group targeting two selected shoe products
Why multiple item groups
A single item group is enough for the common case ("any 2 shoes for $50"). You'd reach for multiple item groups when the promotion requires a combination – for example, a "buy a shirt, get a tie 50% off" promotion needs one group matching shirts and another matching ties.
Linking item groups to the action
Defining item groups by itself doesn't apply any discount; you also need to assign them to the promotion's action in the next tab. There you choose which group(s) receive the discount and any limits like batch count. Multiple item groups can be defined but only some applied – the rest can be used purely as preconditions for the promotion to fire.
Promotion action
The Action tab is where you define what the promotion actually does when it applies. The available actions depend on whether you're building an Item Group or Whole Cart promotion.
Item Group promotion actions
You'll pick exactly one of three action types, then assign it to one or more of the item groups you defined on the previous tab.
- Set a Fixed Total Price – sets a single price for the entire batch. Use this for "any 3 t-shirts for $50"-style bundles.
- Apply a Percentage Discount – reduces the batch price by a percentage. Use this for "20% off all shoes". Optionally cap the discount with a maximum amount.
- Apply a Fixed Amount Discount – reduces the batch price by a specific amount. Use this for "$10 off each pair of jeans".
You also need to pick which item groups receive the action. At least one item group must exist before you can configure the action.
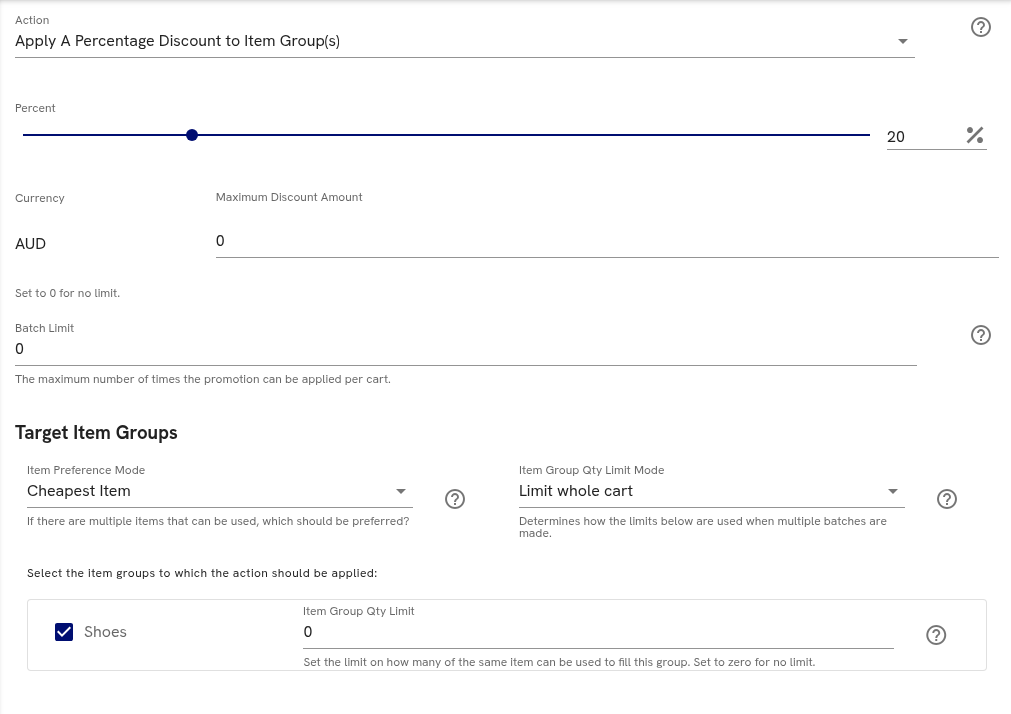
Example Item Group action applying a percentage discount to the Shoes item group
Controlling how many batches discount
- Batch Limit – caps how many batches the promotion discounts. Set to
0for unlimited. Example: with a batch limit of1on a "$10 off shoes" promotion, only one qualifying pair is discounted even if the customer has three. - Item Group Qty Limit – caps how many of the same item can be used to fill a batch before it must use a different matching item. Set to
0for no limit. Example: with a limit of3on a group that accepts two kinds of shoes, a batch will use at most three of one shoe and must fill the rest from the other kind. - Item Group Qty Limit Mode – controls whether the Qty Limit applies per batch or across all batches:
Limit Whole Cart– the limit applies across every batch combined. With a limit of 3, only 3 of any one item are ever used by this promotion regardless of how many batches are made.Limit Per Batch– the limit applies independently to each batch. With a limit of 3, each batch can use up to 3 of one item.- In
Limit Per Batchmode the limit must be lower than the group's quantity – otherwise it has no effect.
Controlling which items fill the batches
When a cart has more matching items than the promotion needs (for example, four shoes for a "buy 2" group), Deducto has to decide which two items to apply the discount to. The Item Preference Mode controls this:
Cheapest Item– Deducto picks the cheaper matching items for the discount. Use this when you want to give a discount but keep your high-value items at full margin.Best Discount– Deducto picks the items that produce the largest customer-facing discount. Use this when you want the most generous outcome for the customer.
Whole Cart promotion actions
For Whole Cart and Whole Cart (Final) promotions, you choose one of:
- Apply a Fixed Amount Discount – reduces the cart by a specific amount. Example: "$25 off orders over $100".
- Add a Promotional Item – automatically adds a free or discounted item to the cart. Example: "Free gift with purchase". This is one of the main use cases for
Whole Cart (Final). - Apply a Shipping Discount – reduces shipping costs by a percentage. You can target all shipping methods or only specific named methods (as defined in your project's locale settings). This is the other primary use of
Whole Cart (Final).
Additional settings
- Exclude Products – set exclusion conditions on product attributes to keep the discount from applying to certain items in the cart. If no exclusion conditions are set, the discount applies to all products in the cart and is proportionally distributed across all eligible items.
- Maximum Discount – caps the total discount amount the promotion can grant.
- Currency – lets you set different discount amounts for different supported currencies, so a "$25 off" promotion can map to an equivalent value in EUR, AUD, etc.
When all tabs are filled in, your promotion is ready to go live. You can return and edit any tab from the project's Promotions list at any time.
Next steps
For practical examples and inspiration, check out our promotion templates. They contain step-by-step instructions for common promotion scenarios like:
- Product discount based on product attributes or ID
- Flash sale
- Free shipping thresholds
- Bulk discounts
- And more
These templates can help you understand how different promotion settings work together to create specific discount behaviours.
Updated about 2 months ago